
Anduino

Anduino revisions
The Anduino is a pretty streightforward clone of a Sparkfun Arduino Pro Mini and Ed Baafi’s Fabkit/Fabduino. Just as Ed did, since there is no 8/16Mhz oscillator in the fab inventory, I used the internal oscillator. This is an 8M oscillator that fits on this board.
I felt compelled to put together an Arduino clone because I have been developing quite a few shields recently, and needed a clone to prototype with. The Anduino is fully “shield compatible” (except for ARef).
For 5V in there is a two pin 0.1″ header and a mini-B USB connector (because I have been powering projects recently with USB chargers). I removed the copper from around the Vin pins so you can graft a right angle header there if needed. On many of my prototypes, I didn’t install the 5V regulator, choosing instead to power it with only the USB connector.
Errata
There are some errata:
-
No ICSP headerSee the ICSP shield below - No USB Serial converter – requires use of FTDI cable (I’ll probably add a different version with a ATMega16U2 like the UNO)
-
RX and TX swappedFixed - AREF not connected
-
Reset requires jumper wireYea… - Vin voltage regulator is only 150mA, should probably be 500mA
None of those errata are show stoppers except for RX/TX swapped. This will be fixed in a near future revision. Fixed.
Programming

ICSP Shield
I built an ICSP shield to program the board with the FabISPkey (and to work around the lack of an ICSP header).
To use the Arduino environment with my Anduino, I followed Ed’s notes – particularly those for OSX.
- First, I placed a board description file boards.txt in the hardware directory of my Arduino sketchbook
- OSX:
~/Documents/Arduino/hardware/anduino/boards.txt - Windows:
Documents/Arduino/hardware/anduino/boards.txt - Linux users are prompted for their sketchbook location
- Restart the Arduino environment
- Then, I selected my board from the list of boards, and used my FabISPkey to program it (in Burn Bootloader, select USBTinyISP).
- Then, connect a FTDI cable (observe orientation! green closest to button), and program normally.
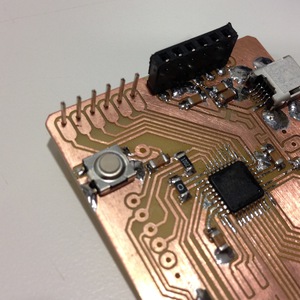
Headers
 |
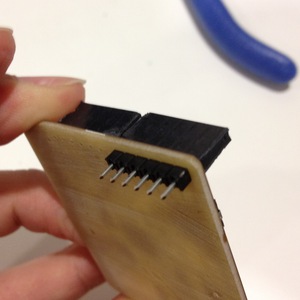 |
It’s kinda difficult to find headers that you can surface mount like this, I used these and heavily modified them.
Better choices for these headers might be:
They’re pass through headers, so I aligned them by putting a header through the holes, then surface mounting the headers as the photos above show.
Doing it Yourself
To play along at home, you can grab a zip made 12/7/11 or check out the most recent version from my git repo.
git clone git://git.bardagjy.com/fabduino